This Pinterest tutorial for WordPress users will help you to start getting traffic from Pinterest to your blog. Pinterest is a visual search engine and is one of the most underused free traffic channels that you can leverage to grow your blog. When it's done right, Pinterest marketing can drive a ton of referral traffic. This is a beginner's tutorial to getting started with Pinterest for WordPress managers and bloggers. Leverage the 300 million users of this content discovery network to get new visitors to your blog every month.
It's assumed that you have basic knowledge of WordPress and blogging. Let's dive in
- Pinterest tips
- How does Pinterest work?
- Setting up a Pinterest Account For A Business
- Add Your Pin Images to Your Boards
- How to Create Pinterest Pins for WordPress
- Tips for creating great pins
- How to get people to share your content on Pinterest
- How to schedule pins
- Automating posting
- Pinterest widget for WordPress
- Use Google Analytics to see which pins work best
- How to hide pinterest images in wordpress
- What is a Pinterest meta tag?
- Best Practices
Pinterest tips
- Create boards on Pinterest that complement your WordPress blog categories
- Create pins that are 1500 x 1000. Reduce the weight of the image by optimizing them.
- Add at least one pin to your blog posts. Make sure it's an image with text that will capture people's attention
- Add a social sharing button plugin or Pinterest hover button to your WordPress site.
- Encourage people to share your content on Pinterest by adding a call-to-action
- Use Pinterest Analytics and Google Analytics to discover which pins are working best
- Use the platform as a user first. Then as a marketer or website owner. Pinterest is focused on user experience so if you blindly throw marketing tactics at your social media strategies, this channel may not work for you. Get a personal account on Pinterest and imagine you were using the platform as your ideal client (or “avatar”, to use the buzzword for a human who buys stuff from your business).
- Pinterest is not a social media platform. It’s a visual discovery search engine. That might sound a bit over-the-top but it’s the best way to describe this platform for discovering new ideas. Pinners (the people that use the platform) are drawn to great visuals. The images you use on your pins are the most important factor. But don't forget to create compelling titles.
- People follow other people (pinners) on the platform but that’s not a major part of how the platform works. It’s more like Google than Facebook or Instagram. The platform encourages people to click pins and visit other websites. So once you become skilled at creating eye-catching and click-worthy pins, you can generate a lot of free traffic, just like you can with Google organic search.
How does Pinterest work?
People use Pinterest to get ideas or inspiration. They also use it as a resource for learning. It's popular with people looking for ideas on DIY projects, crafts, and design. Travel bloggers use it to research locations. Followers of fashion trends use Pinterest to discover new apparel and accessories. The blogging and entrepreneurship niches are also well established on platform, so don't be discouraged if your niche is not “visual”. The key is creating attractive pins with titles that people want to click.
Most Pinterest users search for new products and services rather than brand names. So even small businesses and influencers can compete against well-established businesses.
Example: Let's imagine you own a local business and you are researching some ideas for marketing the business through SEO. Enter local SEO-related search terms in the search bar at the top of the screen and Pinterest will display pins that align with your search.
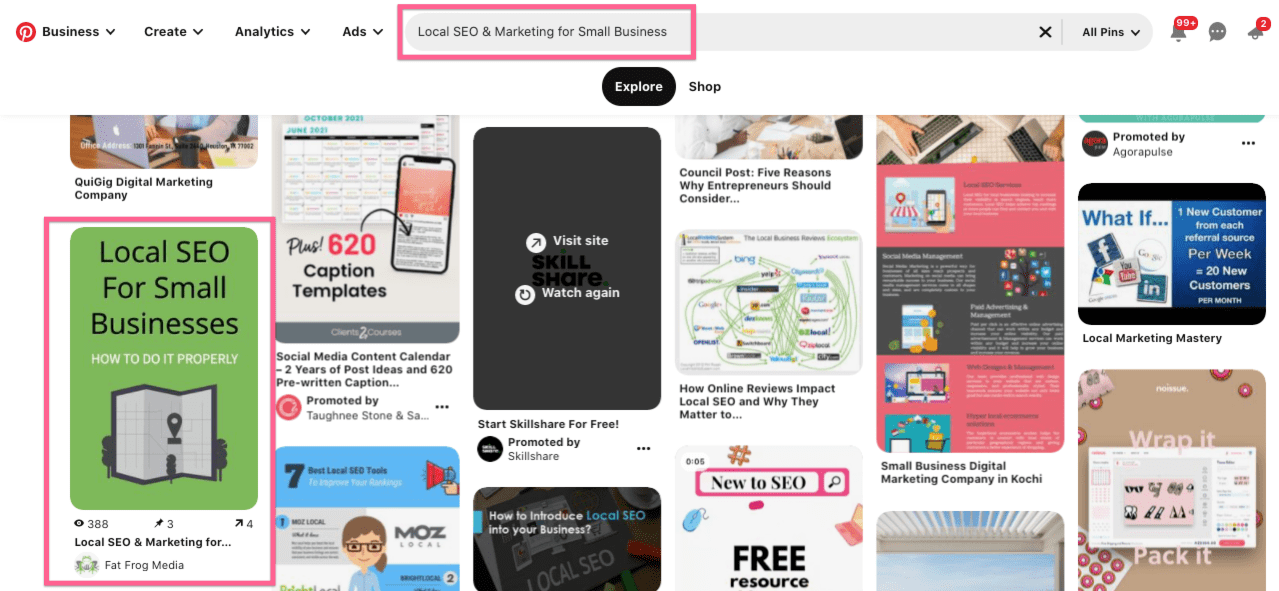
When you see a pin that grabs your attention, you have three options (on desktop devices):
- Click on the pin image to open up a more detailed view of the pin, its description, hashtags, comments, and domain. You can then visit the website to read the content by clicking on the image, the title, or the URL. You can also save the pin to one of your boards to read later by selecting a board (top right of the pin window) and clicking the Save button.
- Select a board and click Save to add the pin to a board for later (without clicking through)
- Click the image or URL to visit the website
On Mobile, you can’t click straight through to a website without opening up the pin first. Once you tap to open the pin, you can visit the URL by tapping the image, title or Read It button. Alternatively, you can click the Pinterest Save button to add the pin to a pin board.
Most people create boards on their account to save multiple pins for later reading. Or they save pins in one board for better organization and categorization of the pins they like.
Setting up a Pinterest Account For A Business
With 2 billion searches a month on the platform, it's likely that many people are looking for content in your niche.
Let’s take a look at how you can set up Pinterest for WordPress to maximise this excellent organic search channel.
First, you need a Pinterest account. And if you’re going to be using it for business, get a Pinterest Business account.
Once you've created an account and updated your Pinterest Profile, start adding Pinterest boards that are relevant to your website or blog. If you blog about food, then a board about easy to prepare meals might be a good choice. Boards about desserts, vegetarian meals, meat recipes, or one-pot dishes might work for your brand. Travel bloggers might choose to create one board for every country they have written about. Digital marketers might use board names like SEO, WordPress Tutorials, Social Media, and Google Ads.

A good way to figure out which boards to create is to use your blog categories for inspiration. Make a board on Pinterest for each category on your blog. In WordPress, you can see your categories by going to the WordPress Dashboard, selecting Posts, and clicking Categories. You can also open the sitemap and, if you allow your categories to be indexed, you'll find them there.
Use your blog categories for inspiration when naming Pinterest boards
And this is why I always tell new bloggers to spend plenty of time thinking about their blog post categories. Creating an organized structure for content is one of the keys to success in blogging and on Pinterest.
Add Your Pin Images to Your Boards
Create beautiful, inspiring, and clickable pin images for your content.
Add the images to your blog posts. Some bloggers add Pinterest-style images throughout their post content. Others add pin images at the end of the content. Some people prefer to hide their pins. More about that later.
Next, share your pins to your boards.
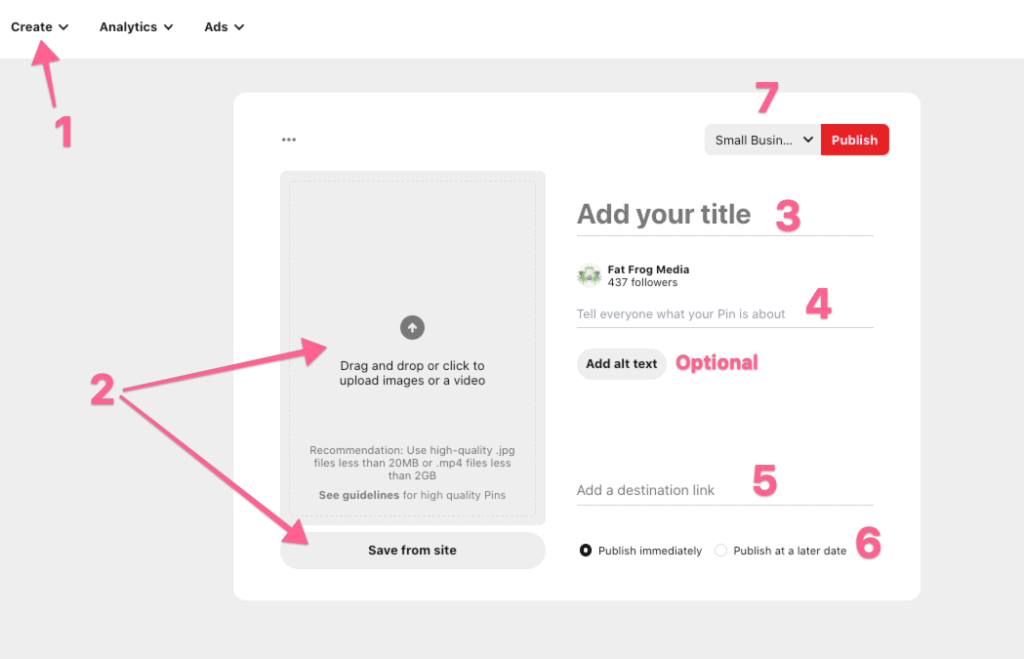
- In Pinterest, click Create and select Create Pin
- Either drop the image into the image box on the left or click the “Save from site” button and add the URL of your post or page.
- Add the title of the pin. This should be somewhat similar to the title of the blog post.
- Add a description that makes people want to click. Include a few hashtags. Examples: #SEO #PinterestMarketing #WordPressBeginner
- Add the content URL
- Choose a later date to publish or leave the default “Publish immediately”
- Choose a board to pin the image to.
You can also add alt text to the image just as you would with a WordPress image.
How to Create Pinterest Pins for WordPress
This is an art and a science all rolled into one. That’s to say, it can be a guessing game and the best way to find out is through experimentation. Create and share lots of different pins for each piece of content and analyze which ones work best.
Canva is one of the most popular tools for creating pins for several reasons. The free plan is excellent and suitable for most beginner to intermediate bloggers. Anyone can design great-looking Pinterest images on Canva. The platform is fast and the user interface is foolproof. Canva’s free and paid templates are professionally designed, regularly updated, and customizable. An alternative to Canva is Snappa, which has fewer capabilities but has a nice design and some unique features that might work better for your needs.
Tips for creating great pins
Pinterest offers a few hints as to what they expect your images to look like. Many industry experts have also imparted their knowledge based on data. These guidelines change but as long as you keep up with the recommendations, you’ll be ahead of most other blogs.
- Make the text font readable both for search engines (Google and Pinterest) and users. Overlay contrasting text colors or add a background to the font to highlight it.
- Pinterest images should be 1000 x 1500 (2:3 ratio, width to height). That’s 1000 px wide by 1500 px tall.
- Make sure pins are readable on mobile (this is where most of your traffic will come from)
- Reduce the “weight” of your pin image so it doesn’t slow your site. Choose JPG and try to keep the weight below 300kb.
- Avoid using people’s faces on your pins. Pins without faces get more clicks.
- Create multiple variations of your pins to share on Pinterest and see which ones get the most clicks. The highest clicked pin could replace the current one on your post.
- Experiment with adding a logo. It can look professional but it can also appear vain. It can also detract from the message. Your audience will decide.
How to get people to share your content on Pinterest
Make it easy for people to share. Add a social sharing plugin.
While the value in having a social sharing plugin on WordPress is debatable (few people share these days and a social media plugin can slow your website), Pinterest users are more likely to save your content if you offer them an easy way to do it. So it’s worth adding a social plugin just for this platform.
There are other ways to offer and easy pin experience. Most involve editing the source code of your WordPress site so that’s not the best option if you’re not technical or you just want an easy way to get started.
Some share buttons plugins that will do the job. I’ve picked these three because these WordPress Pinterest plugins let you specify a particular image that gets shared when someone clicks the Pinterest button. This helps prevent random and unoptimized images getting pinned.
- Shared Counts
- Social Warfare
- Tasty Pins is great for food bloggers
- Scriptless Social Sharing
- Grow by Mediavine (formerly Social Pug)
People that use the Pinterest button on their browsers will see the red “Save” button appear on every image they hover over. They can save your images to their boards without any help but not everyone uses this browser plugin.
Note: many bloggers are still recommending the Pinterest Pin It Button For Images WordPress plugin. This hasn’t been updated in years so I don’t recommend using it.
Another way is to go to the Pinterest Widget Builder page and get the code for an image hover button. I use a larger, round image hover button but you can customize it for your website. Here’s an example:
<script async defer data-pin-hover="true" data-pin-tall="true" data-pin-round="true" src="//assets.pinterest.com/js/pinit.js"></script>
You can add this code to the header in your WordPress site. A smarter way is to add the code using Google Tag Manager so you can specify which pages it appears on.
The only problem with adding this code is that the hover button or Pinterest ‘pin it' button will appear over every image on the site. And this can be distracting. You also might not want people to pin certain images. People will pin horizontal images and tiny, illustrative images from your content. Ideally, you want them to only share the images you created specifically for Pinterest. These images, when shared on the platform, are more likely to earn clicks from users.
How to schedule pins
I used to use Tailwind but I don’t think it’s worth the cost anymore. Tailwind was created to let people repeat-save Pinterest pins to their boards in an automated way. This is not the best practice in 2021 and I wouldn’t recommend doing this.
Tailwind’s Tribes feature worked better in the past although it still has merit.
One feature that still works really well is the ability to schedule pins in one interface. Tailwind will also pick the best times to schedule and you get access to really great analytics data (better than Pinterest’s own data).
Another option is to schedule pins using Pinterest's own scheduling feature.

Automating posting
I'm not discounting the value (in saved time, money, and sanity) of automating your Pinterest pins. I think it's a great idea if done properly. And there are better solutions than the old “Tailwind” way of repeating the posting of pins.
If you're looking for a Pinterest automation tool and possess basic no-code skills, or simply the desire to create uncomplicated automations without the need for coding, then Bannerbear and Canvas are worth considering. Use these tools to automate the image creation process.
Use Bannerbear or Switchboard Canvas with automation tools like Zapier (or excellent Zapier alternatives like Make and Pabbly Connect) to automate the creation and posting of pins. Bannerbear and Canvas offer APIs (with an easy-to-use visual interface) for instantly generating images based on your own templates and then automates the scheduling and posting on social media. It works like a dream.
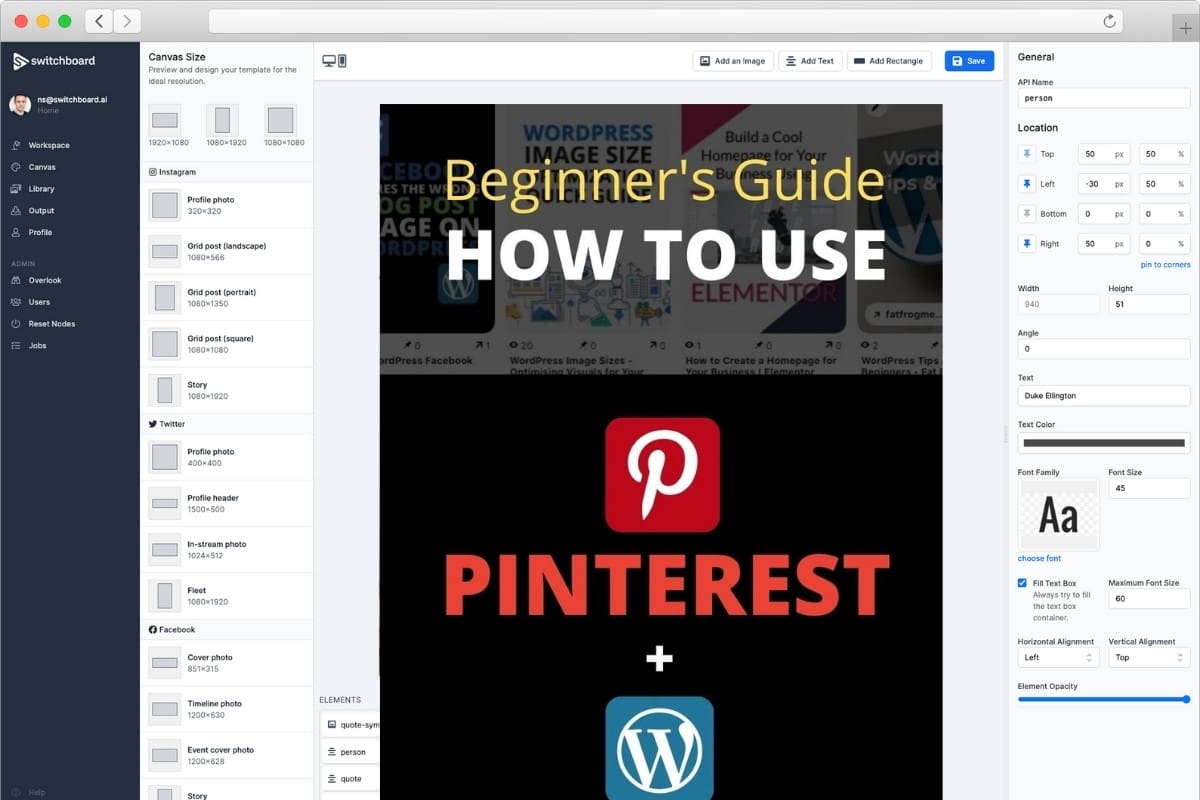
All you need to do is create new rows in Airtable or Google sheets with some text, the content URL, and an Image. This is a task you can assign to a virtual assistant but it's also something that can be automated with some clever scripting.
If that seems like a lot of work but you're happy enough to have less control of your pin designs, PinGenerator might be an option. This automatic pin creation tool allows you to automatically generate pretty decent-looking pins from any URL.
It's free to use for 15 generations a month but monthly plans are very reasonable. You can also schedule pins so it's a great option to get started with or it can be a task to hand over to a virtual assistant.
Pinterest widget for WordPress
Adding a Pinterest widget to your WordPress site is a good way to showcase a board or a pin that you want to promote. It also helps show people that your site has a Pinterest account.
Some WordPress plugins can do this but the most efficiency way to do it (and the most secure way) is to use the Widget Builder. Here's an example of a Pinterest board widget that's easily embedded in a post or sidebar.
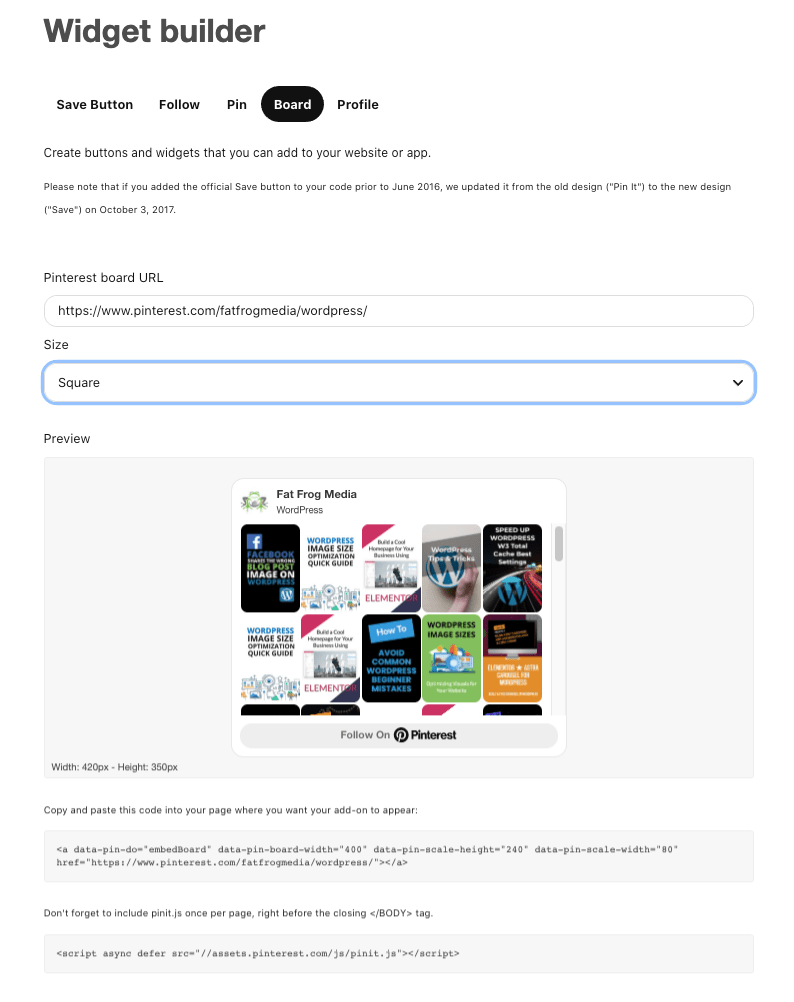
You can also create Pinterest gallery widgets and single pin widgets.
Use Google Analytics to see which pins work best
Google Analytics is a great resource for learning which URLs on your website get shared the most and which pins drive the most traffic back to your site.
To see which URLs get shared most:
- Open Google Analytics
- Open the Acquisition report
- Click Social
- Click Network referrals
- Click Pinterest to see which pages get shared the most on the platform
To see which pins drive the most traffic, open the Acquisition report
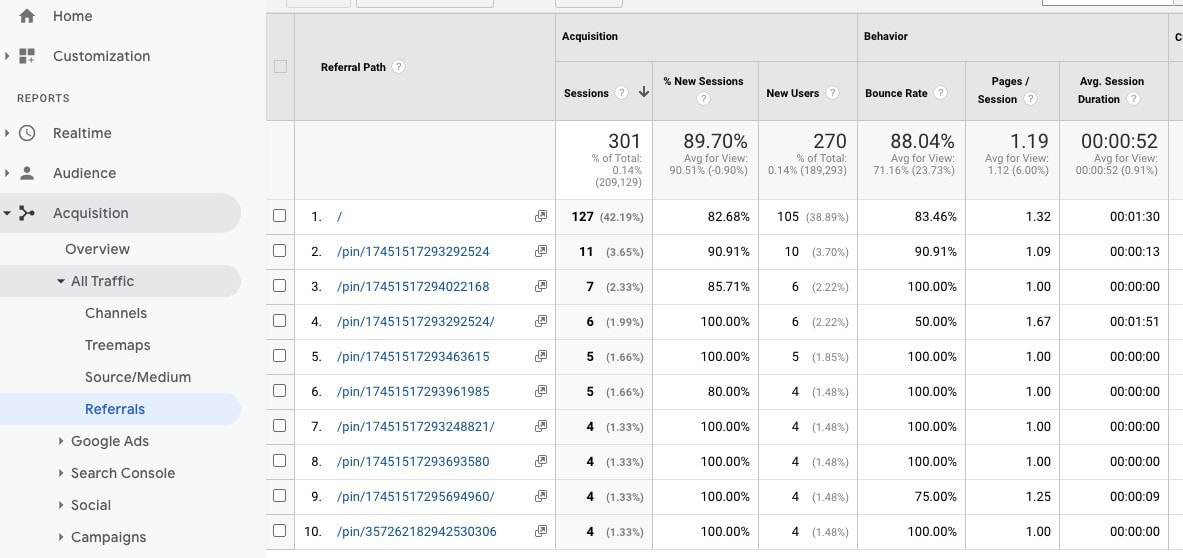
- Open the All Traffic report
- Click Source/Medium
- Click Referrals
- Choose Pinterest.com
Here you’ll be able to see which pins were clicked the most on Pinterest.
Discover which pins are sending traffic to your website with the Google Analytics Referrals Report
You might see a row with just / or pinterest.com -> these are clicks from Pinterest’s homepage directly.
How to hide pinterest images in wordpress
Some WordPress users prefer to hide some or all Pinterest images to make their blog posts less cluttered. Others like to add multiple images to a post and hide them all so that pinners have a choice of Pinterest-optimized mages to choose from when they choose to share your content.
The easiest way to hide a Pinterest image in WordPress is to use a CSS class that tells the browser to hide specific images. A CSS class is a snippet of code uses by browsers to determine how content should be displayed. This is an example of code to hide an image
.hidden {display: none;}
Simple.
Add this to your style sheet. In most WordPress themes you can add this in the Customize tab in the WordPress dashboard. Look for the Additional CSS section.
Now when you want to hide an image, just add hidden to the CSS class to the image block. In the Block pane on the right-hand-side, look for Advanced and then Additional CSS class(es).
Add the word hidden to any image you want to hide.
What is a Pinterest meta tag?
The Pinterest meta tag (also called HTML tag for the purposes of this explanation) is a piece of code that you add to your website so that Pinterest can verify that you are the owner. Once the platform verifies that you own the site, you can claim it in Pinterest for Business and get access to analytics and other benefits.
You can add this HTML tag to the <head> section of your WordPress theme either by editing the source code directly or using a plugin that lets you edit this section. (hint: use the second way).
Some WordPress themes come with tools that allow you to add tags and code via hooks.
Another option is to add the code with Google Tag Manager.
There are other ways to claim and verify your website for Pinterest. Find out more here.
Pinterest wants new designs and images. It especially wants pins for new content. Give the platform what it wants and reap the benefits.
Best Practices
- Make new images every time you pin your content to Pinterest. Don't use the same image for at least 6-12 months. Pinterest wants fresh images and new content.
- Pin mostly your own pins to your boards. Only create boards if you have content to share
- Followers don't matter so don't worry about getting them
- Group boards are not as important as they used to be. You can safely ignore them.
- Use 1-3 highly-relevant hashtags in your pin description. Write a description that makes people want to click.

